|
Step FOUR
Activating the Host Computer
Finally,
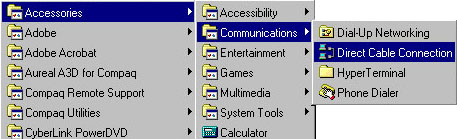
- Click on Start
- Programs
- Accessories
- Communications
- Direct Cable Connection
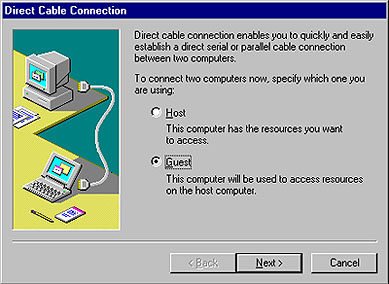
- Make sure it still says Host, then click on Next
- Make sure Parallel cable on LPT1 is selected, click on Next
- If you don't want to require a password, click finish, but if you want to require a password for logging on from the other computer, put a check mark in Use Password Protection, and click on Set Password... Note that this password is different from the passwords we talked about earlier. The password you're about to define will be required for access to this computer. The other passwords we talked about earlier will be required only when trying to access the particular protected resource. So let's say I password-protect the cdrom drive, it means only those with the password can access that drive.
- Enter passwords, and click on OK
- Click on Finish
You should now see the window below

Phew! that was a long one. But wait a minute, we're not done yet. We still need to configure the guest computer. Most of it is similar to what we just did though.
Guest Configuration
All of the steps above need to be repeated on the guest computer also, starting from Step ONE, with only minor differences. Here are the differences you need to take into account
- In step 6 under step ONE, you will put a dot in the Guest radio button
- In step 6 under step TWO, you will enter 192.168.0.2
- In step 12 under step TWO, type in a different computer name from what you used for the host computer. It is very important that the host and the guest computers be given different computer names!
- You may skip Step THREE entirely, since the Host computer won't be accessing any resources from the Guest computer
- In step 6 of Step FOUR, Choose Guest, in place of Host.
- You won't be prompted for any passwords this time. Before you click Finish, make sure the Host computer is ready to accept connection from the Guest. After you click Finish you should get this
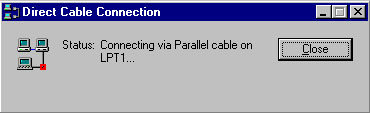
Now the Guest should connect to the Host and you should be able to access resources on the latter.
To see the resources, click on Network Neighborhood on your Desktop. You should see the names you gave to both computers. If the names don't come up immediately wait a few minutes, and they should come up eventually. If your computers still can't see each other after a few minutes, click on F5 several times to refresh the screens. Once the names appear, you can now double click on the Host (you're now working from the Guest of course), and you'll see all the shared drives and folders. If you defined passwords while setting up the Host, you would be prompted to enter the passwords for each resource at this point.
You're Done!
Networking Using NIC
A better means of networking computers is through the use of network cards. The speed of data tranfer is a lot higher, and your computers can be as much as 500 meters apart.
With only two computers you don't need a hub and if you decide to add more computers later on, the hub can be purchased then. Also you don't need any special software. Windows 95, or better, is already equipped with all you need. I used two 3com networking cards (one for each computer)
that use either the coax 10base2 connectors or the RJ45
crossover cable 10baseT. Notice I said crossover. Your cable has to be a crossover cable, or else it won't work.
If the terms above sound cryptic, don't worry. The store you will go to for the cables will know what you're talking about. But for basic knowledge, there are three types of cables 10Base2, 10Base5, and 10BaseT. The 10 in front of each name indicates that the cable transfers data at a rate of about 10 mega bits per second (this is about 1.2 MBytes/sec). The numbers 2 and 5 indicates how far each type of cable can transfer data. 2 can handle up to 200 meters, while 5 goes up to 500 meters. The T in 10baseT stands for twisted pair cable. It's a type of networking cable that uses BNC plugs. In addition to the 10base cables, there are also 100base cables. Which, as you must have guessed means the cable can transfer data at 100Mbits per second. So if you want a very fast network, or if you will be transferring a lot of data in real time, then you might want to set up a 100MBit network. A situation where you might need this is if you will be playing games with high level graphics. Of course your network card has to support 100MBit transfer.
I have the RJ45 cable and had one specially made to make sure it was a cross-over cable and it's about 10' long just so I didn't have to go from room to room to
see both monitors and computers until I knew it would be set up
right. I am ordering a 70' one now so I can have one computer in the living room, and the other in the bedroom. I had to use the latest drivers that go with the cards because
even though W98 installed the correct drivers, they weren't the
newest and I had problems getting the computers to see each
other so whatever cards you decide to get, make sure you
download the newest drivers ahead of time in case what comes
with them aren't what you will need. Save yourself the grief I
went through. After the cards and the cable are connected and are set up in
the computers, open the Network in Control Panel or right click
the Network Neighborhood icon and choose Properties. On the list that shows up you need to have the
following...
- Client for MS Network
- Dial Up Adapter
- The Networking Adapter that you installed,
- TCP/IP > Dial Up Adapter,
- TCP/IP > your network adapter,
- File & Print Sharing.
|
All of the above must be on the computer that will connect directly to the Internet (the Gateway).
All other computers (the clients) will access the Internet through this one computer, hence you don't need to install the Dial Up Adapter on the clients. There would be no need for them to have modems installed in them either.
|
If any of the listed items above is missing, do the following...
To add TCP/IP,
- Click on Add
- Click on Protocol
- Click on Add
- Click on Microsoft
- Click on TCP/IP in the right window
- Click on OK
Repeat the above steps, to add IPX/SPX-compatible Protocol.
Finally, repeat the same steps, to add NetBEUI.
If adapter is missing from our earlier list, you must add it.
- Click on Add
- Click on Adapter
- Click on Add
- Click on Microsoft
- Click on Dial-Up Adapter in the right window
- Click on OK
If File and Printer Sharing is missing the list, add it as follows:
- Click on Add
- Click on Service
- Click on Add
- Click on Printer Sharing for Microsoft Networks in the right window
- Click on OK
|