Everybody should learn HTML. You say why? Well, because it's very easy to learn. In less than 30 minutes, you could learn the basics of HTML. Of course I'm assuming we already know what HTML is, which is not right. So let's simply say that HTML is the computer language for creating a webpage.
HTML itself is an acronym for HyperText Markup Language. A hypertext is text you can click on to visit another location.
Several programs exist for creating webpages, and most of them are free, or are available within programs you already have. Examples are Microsoft Word, Netscape browser, and tons of free HTML editors at download sites like download.com, or hotfiles.com. Frontpage is a popular HTML editor.
While these programs will help you build a webpage, you cannot get your website looking exactly the way you want, without using HTML. Learn HTML and get your website layout to your exact needs.
Objectives - Having read through this tutorial you should know the following:
Requirements
Basics
The Skeleton
Spacing & FILO
Title tag
Hands-on practice
Body tag
Background Color
Hexadecimal Codes
Background Image
Formatting output
Text color
Font color
Bold, Underline, Italic, Strikethrough
Subscript and Superscript
Heading (H1, H2, H3, etc)
Character codes
Aligning Items
Images
Lists
Forms
What do we need?
You already have what you need:- A text editor like Notepad
- An Internet browser (Explorer, Netscape)
All HTML codes are contained in angle bracket signs like this < >
Here's good news... html codes are not case sensitive. So <BODY> is the same as <body>, which is the same as <bOdY>
HTML codes are called tags. So <body> is called body tag.
Most html tags (with the exception of a few) come in pairs, the opening and the closing tag. The body tag for example comes as <body> </body>. <body> is the opening tag, while </body> is the closing tag. Closing tags are always preceded by a forward slash.
The Skeleton
I call it the skeleton because every html page you build will have this basic code.
<html>
<head>
<title>
</title>
</head>
<body>
</body>
</html>
You will always have the above tags in that order in every html webpage you build. If you like you could actually save this somewhere, so you won't have to re-type it everytime.
HTML is very flexible when it comes to spaces. You can put as many, or as few spaces as you want between tags, it doesn't matter. Basically, it's the first space that is shown in html. Every subsequent space is ignored. If for instance, you type two words and separate them with ten spaces, those two words would be shown separated by a single space on your webpage. The remaining nine spaces are ignored.
There are no rules as to how you should separate your tags. You could write all your codes on one line if you like. So the skeleton above could have been written as
<html><head><title></title></head><body></body></html>
OR as
<html>
<head>
<title></title>
</head>
<body>
</body>
</html>
They all mean the same thing
As you know by now, most html tags come in pairs. Take a look at the skeleton and you will see that the codes all occur in pairs, and the closing tags have forward slashes in front of them. Also, you might have noticed something peculiar about the way the tags flow. The tags that come first are closed last. In this case <html> came first, but was closed last with </html>. I call this first-in-last-out (FILO) rule.
It is very important to observe the FILO rule, otherwise your html coding will not work. It is a rule you will use every step of the way in html, so keep it in mind. Take a look at the coding below and try to spot what is wrong with it.
<html><head><title></head></title><body></body></html>
Well this is wrong with it
<html><head><title></head></title><body></body></html>
The FILO rule was broken because <head> came before <title>, and therefore should be closed after </title>.
The correct code is:
<html><head><title></title></head><body></body></html>
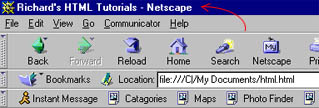
<title> </title>
Within skeleton is the title tag. Whatever you type between the title tags will be shown on the title bar of your browser. The title bar is the first bar at the top of your browser. See the picture below
Let's get some hands-on practice
- Open up Notepad (Start/Programs/Accessories/Notepad)
- Paste your skeleton into it
<html>
<head>
<title>
</title>
</head>
<body>
</body>
</html> - Type in your title. I'll call mine Richard's HTML Tutorials
<html>
<head>
<title>Richard's HTML Tutorials</title>
</head>
<body>
</body>
</html> - Now save the file you've created (File/Save As...), and under File name, type "mypage.html", but keep Notepad open. You must include the quotation marks when saving your file with notepad. By default notepad saves files with .txt extension. No matter what you type as the filename, notepad will add .txt to the end. So if you type mypage.html as the filename, notepad will save it as mypage.html.txt. Of course, we don't want the .txt, and that's why we put the filename in quotes. The quotation marks tell notepad to save the file with the exact name we typed in.
- Once the file is saved, open up your Internet browser (you don't have to be connected to the Internet to do this) and use it to open mypage.html (File/Open Page...). You will see a blank page, and if you look at the title bar, your title should be shown with the name of your browser next to it. If you don't see the title, you probably did not observe the FILO (first-in-last-out) rule, so take a look at your codes in notepad.
<body> </body>
Currently, your webpage is blank. We are now going to add content. Whatever you type into the body tags will show up on your webpage.
- Go back to notepad containing your codes.
<html>
<head>
<title>Richard's HTML Tutorials</title>
</head>
<body>
</body>
</html> - Type something between the body tags. Let's say New York, a city that never sleeps.
<html>
<head>
<title>Richard's HTML Tutorials</title>
</head>
<body>New York, a city that never sleeps</body>
</html> - Save the file (File/Save).
- Now return to your browser and click on the Reload or Refresh button. You should now see New York, a city that never sleeps at the top left hand side of your browser. Sometimes, merely clicking on the Reload button will not update the page. In that case, press and hold the Ctrl key, then click on Reload.
You have learned the basics of HTML. What you have now is basically a webpage. From this point on all you need to do is to populate it with your content.
Background Color
To change the background color of your page, we will add some attributes inside the body tag. An attribute is the characteristic of something. Let's say you have a shirt. That shirt is the object, while the color, size, texture, etc. are it's attributes. HTML uses a simple convention for attributes... First you take the tag and put the name of the attribute inside the tag, then an equal to sign, then the value of the attribute. A single tag usually has several attributes, see below.
<html>
<head>
<title>Richard's HTML Tutorials</title>
</head>
<body bgcolor="yellow">New York, a city that never sleeps</body>
</html>
bgcolor is the <body> attribute for background color. In this case, we want our webpage to have a yellow color.
Save the file and reload your browser. You should see the same webpage as before, now with a yellow background.
Now change the word yellow to green,
<html>
<head>
<title>Richard's HTML Tutorials</title>
</head>
<body bgcolor="green" >New York, a city that never sleeps</body>
</html>
Save and reload page. Background should change to green. Are you getting the idea? You can change the background color just by typing in the name of the color.
As I explained before, HTML uses the following convention for attributes
name of attribute="value of attribute"
as you can see in the body tag above.
The = sign has no mathematical significance, so don't make the mistake of interpreting it as the result of something.
In defining your colors, besides typing the name of the color as we've done so far, there's another way to define the color - by Hexadecimal codes. Take a look at my Hexadecimal page to see how it is used, then return here to continue the tutorial.
A little about Hexadecimal. You don't have to read this part if you don't want to. Hexadicimal (hex) colors are represented by blocks of six hex values. As you may know, hexadecimal is base sixteen, just as binary is base two. Hex values are: 0, 1, 2, 3, 4, 5, 6, 7, 8, 9, A, B, C, D, E, F.
To obtain a color, take any six of the above hex values, precede them by the # sign, and you've got a color. If you're mathematically inclined, how many colors can you get by combining all possible blocks of six values out of 16 values? The answer is
16! / (6! * 10!) = 8008.
The exclamation sign of course means factorial.
That means you can obtain as many as 8008 colors by using hexadecimal colors. Can you now see the advantage of defining your colors in hex instead of just thinking up the name of the color? Try naming 8008 colors! :)
Click here for a color table.
Using an Image as Background
Instead of using just a color as your background, you could use any image of your choice. There are certain points you need to keep in mind before using an image as your background...- Images load very slowly over the web. Most Internet users are still on slow dial-up connections, so use images that are small in size. Your background image should be no larger than 1K in size. If your image is too large, you will lose you impatient visitors, since the webpage will be slow to load.
- Make sure there is enough contrast between your background and your text, otherwise your visitors may not be able to read what you have on the page.
- You can use images with any physical dimension, ie. width and height. When an image is used a as background, the image gets tilled to fill the page. Hence it's a good idea to make the edges of your background image flow into each other without leaving sharp dividing lines.
The code for background image goes into the body tag as shown below.
<html>
<head>
<title>Richard's HTML Tutorials</title>
</head>
<body bgcolor="green" background="imagename.jpg">New York, a city that never sleeps</body>
</html>
You need to change imagename.jpg to the name of your background image. You can see that I still have the background color defined, even though I'll be using a background image. It is good to define a background color, since this will be shown first before the background image loads. Also in the event that the background image is unavailable, the color you defined is used instead.
You use bgcolor= to define the background color, and background= for the background image. They both go in the body tag.
Formating Your Output
Formatting means changing the appearance of something. You can change the appearance of your text in various ways. Some of these are: size, color, italic, underline, bold, heading, etc.By default, HTML shows black text on white background. We've seen how to change the background characteristics. You can also change the text color on a webpage by adding the following to the body tag: text="name of color". So for instance, the tag below will produce silver text on a black background...
<html>
<head>
<title>Richard's HTML Tutorials</title>
</head>
<body bgcolor="black" text="silver">New York, a city that never sleeps</body>
</html>
This method of defining the text color within the body tag will affect all the text on your webpage. But what if you want to change the appearance of individual words or sentences? Well, that is easy too. You use the font tag for that, ie. <font>.
<font></font>
<html><head>
<title>Richard's HTML Tutorials</title>
</head>
<body bgcolor="antiquewhite" text="silver">
<font color="green">New York, a city that never sleeps</font>
</body>
</html>
The above will produce green text on antiquewhite background. Anything that goes inside <font></font> will be affected by what you define in the font tag.
You can change the size of your text by adding size= to the font tag.
<html>
<head>
<title>Richard's HTML Tutorials</title>
</head>
<body bgcolor="antiquewhite" text="silver">
<font color="green" size="+3">New York, a city that never sleeps</font>
</body>
</html>
To make your text larger, you need to add a plus sign in front of the number. On the other hand, if you want the text to be smaller, you add a minus sign.
RedOrangeYellowGreenBlueIndigoViolet
RedOrangeYellowGreenBlueIndigoViolet
Bold, Underline, Italic, Strikethrough
To obtain Bold text, enclose it in <b></b>, like so<b>Text Goes Here</b>. This gives, Text Goes Here
To obtain Underlined text, enclose it in <u></u>, like so
<u>Text Goes Here</u>. This gives, Text Goes Here
To obtain text in Italic, enclose it in <i></i>, like so
<i>Text Goes Here</i>. This gives, Text Goes Here
For the strikethough effect, enclose text in <s></s>, like so
<s>Text Goes Here</s>. This gives, Text Goes Here
Other formatting you could apply to your text are: subscript and superscript
To make text a superscript, enclose it in <sup></sup>, like so
16<sup>2</sup>. This gives, 162
To make text a subscript, enclose it in <sub></sub>, like so
H<sub>2</sub>O. This gives, H2O
Heading
The last aspect of text formatting I'll like to talk about is making Headings. With what we've discussed so far, you can easily make custom headings. The way you do that will be to combine the font tag with any of the bold, underline, or italic tags. So let's look at an example.
<font size="+1"><b>This is a Header</b></font>
The above will produce this
This is a Header
There is an easier way of making headings in HTML. That is by enclosing the text in
<H3></H3>. See examples below:
<H3>This is a Header</H3>
This will produce
This is a header
If you want a larger heading, reduce the number in front of the H. So <H2>This is a Header</H2> will produceThis is a header
Changing the number to 1 will make the heading even larger. See as the heading size increases below...
H6
H5
H4
H3
H2
H1
It's interesting how the larger numbers produce smaller-sized headers, but that's the way it is.If you add align=, like this <h3 align="right">H3</h3>, you can control the alignment of the text. You can use right, left, center.
Character Codes
We are now going to look at character codes. Where on your keyboard are the following characters located? Š, œ, ©, ¾, å, Æ, Ñ. I'm sure you can't find them anywhere on your keyboard... Well then, how did I get them on this page?The characters above are called special characters. You cannot type them in from your keyboard since no keys are provided for them. You get special characters by using what is called character codes. Character codes can be used to generate not only special characters, but also any character available on your keyboard. Let's go through the steps for obtaining special characters...
- Take the amphisand &
- Add this &#
- Add some numeric values, eg. á
- Finally, add a semicolon, á
That's it, you've got a character!
Our character code á will give us the special character á.
The only thing that differs between characters is the numeric value. In our example, we used 225. If you wanted to generate a different character, you would use a different value. For example the character ¥ has the code ¥, and ® is for the character ®. Neat huh!
But how do you know which numerical value to use for a particular special character? Well, you can generate every character with numeric values from 33 to 255, and use that as your reference. Take a look at mine here.
Aligning Items
There are many ways of aligning text, images, etc on your page.
The default alignment is to the LEFT of the page. You can CENTER it, or ALIGN to the right.
Let's look at examples.
This text is left aligned
How did we do that?
<DIV>...</DIV>
Use <DIV> with some attributes to align your text.
<DIV align="left">
<DIV align="center">
<DIV align="right">
I don't think this needs any explanation.
Only one of the above is really important. You will see why in a minute.
Another way of aligning items is with
<CENTER>...</CENTER>
Just put something inside the CENTER tag, and it gets centered. E.g.
Most people use the CENTER tag, rather than using <DIV align="center">, which by the way, do the exact same thing as the CENTER tag. Also, because text is aligned left by default, <DIV align="left"> is useless. Hence, the only DIV tag that is useful is <DIV align="right">
There is yet another tag for aligning items. That is with
<P>...</P>
<P> is the PARAGRAPH tag. It puts an item on a new line, with white space at the top.
Use <P> with some attributes to align your items.
<P align="left">
<p align="center">
<P align="right">
When used for alignment, <P> tag works exactly as the <DIV> tag.
With what you've learned so far, you have what it takes to create a decent looking webpage. You can use your knowledge to build your own webpages, or use it in other places like when posting to message boards.
Let's say you want to post to your favorite discussion group on the web, instead of just typing plain vanilla text, you can use your HTML tags to spiff up your post.
Come with me to the next page. There is much more to learn.
Send me a feedback on this tutorial, so I can improve on it. Thanks.