Return to top
Wrapping Text Around Images
Take a look at the illustrations below:
 Butterfly Butterfly
This is a butterfly. A beauty to look at for its panoramic colors and gentle nature. They like to fly in the daytime and flaunt those colors. Moths on the other hand are nocturnal creatures and so less colorful.
Butterfly
This is a butterfly. A beauty to look at for its panoramic colors and gentle nature. They like to fly in the daytime and flaunt those colors. Moths on the other hand are nocturnal creatures and so less colorful. |
The first image has only one line of text next to it, while the second image has text wrapped all around it. The wrap-around effect is very easy to create. Here are the html codes for the two images above.
><img src="image4.gif" />
><img src="image4.gif" align="left" />
So all you need to wrap text around an image is to add align="left". You can also use align="right" to align the image the right margin.
Even though align="left" wraps text around the image, it's not always desirable, since it will wrap all the text next to it around itself up to the limits of its height. What if you want just part of the text, and not all, to be wrapped? For example
Butterfly
This is a butterfly.
A beauty to look at for its panoramic colors and gentle nature. They like to fly in the daytime and flaunt those colors. Moths on the other hand are nocturnal creatures and so less colorful. |
You can use <br clear="all" /> to move text you don't want wrapped to the bottom of the image. Just place the <br> tag at the beginning of such text.
You can also use <br clear="left" /> and <br clear="right" />, depending on your needs. The best way to see how these break the text, is to try them out yourself.
Return to top
Image Maps
That brings us to the interesting topic of image maps. This topic is a bit more involving than anything we've talked about so far. But believe me, it looks like a monster at first sight, but its bark is worse than its bite. If you've spent some time reading this tutorial just before you got to image maps, I suggest you take a 30 minute to an hour break. You need to begin learning about image maps with a fresh brain.
We won't dive right into making image maps, instead we'll first look at some terms you'll need to understand very well.
A map... A map describes the boundaries of something. For example, the map of the USA describes the boundaries of the USA on the world globe.
x, y coordinates... This is better explained visually

The graph above has two dimensions, an x-axis and a y-axis. Coordinates are x and y values that describe the position of a point on the graph. Why don't we find the coordinates of the colored squares then...
- The x, y coordinates of the red square are 1, 1
- The x, y coordinates of the green square are 3, 2
- Okay go ahead and find the coordinates of the blue square... If your answer was 2, 1, you're correct!
Okay with those terms under our belt, let's now tackle image maps.
An image map is an image with links mapped onto it. Once the links have been mapped, you can click on different areas of the image just like any other link on your page. There are several advantages to doing this. It promotes your webpage from the ordinary... gives that site a cool look, if you know what I mean. It also allows you to use a single small image for mapping all your links, instead of using a different image for each link. The points you can click on within the image are called "hot spots".
Examples of Image Maps
AtlasMagazine | gfx STUDIO
http://www.blackplanet.com/
http://www.sabyo.com/
http://www.nevada.edu/~akindel/
http://homes.acmecity.com/music/fractal/149/ftpjazz1.html
Let's take our favorite butterfly and map links onto it.
We will map the four links above onto our image. The image on the left is not clickable (just a solid image like any other), but the one on the right has hotspots and clickable. Try it...

Creating image maps is very easy. The only aspect that may be problematic is determining the coordinates. But here is a solution for you.
Create a webpage with the html code below and replace map.gif with the name of your image.
<A HREF="#"><img src="map.gif" ISMAP /></A> Then open the page in Netscape or Explorer. When you move the mouse over the image you will see the coordinates at the bottom of the screen. Unfortunately, some older browsers do not support this.
If you hit a brick wall while trying to figure this stuff out, don't just give up in frustration. Try it again a couple of times, and if you're still having problems, send me a message with as much detail as possible about the problem.
Remember, nobody is born with this stuff. You have to bust your butt to get it to sink in. So practice, practice, practice. In fact, make mistakes deliberately, and see what happens. You'll be surprised what new stuff you can discover that way :)
Ok now let's go through the three easy steps for adding image maps.
- The tag for image maps is
<MAP NAME="RichieMap">
</MAP>
- Define your coordinates within the MAP tag. For example, the coordinates for our image map above is:
<MAP NAME="RichieMap">
<AREA SHAPE="rect" HREF="http://www.blackplanet.com/" COORDS="7,4 90,14">
<AREA SHAPE="rect" HREF="http://www.sabyo.com/" COORDS="40,26 92,40">
<AREA SHAPE="rect" HREF="http://www.nevada.edu/~akindel/" COORDS="2,52 91,66">
<AREA SHAPE="rect" HREF="http://homes.acmecity.com/music/fractal/149/ftpjazz1.html" COORDS="6,75 93,95">
</MAP>
- Finally, add the line
<IMG USEMAP="#RichieMap" SRC="map1.gif" BORDER="0">
Now the whole thing together will be
<MAP NAME="RichieMap">
<AREA SHAPE="rect" HREF="http://www.blackplanet.com/" COORDS="7,4 90,14">
<AREA SHAPE="rect" HREF="http://www.sabyo.com/" COORDS="40,26 92,40">
<AREA SHAPE="rect" HREF="http://www.nevada.edu/~akindel/" COORDS="2,52 91,66">
<AREA SHAPE="rect" HREF="http://homes.acmecity.com/music/fractal/149/ftpjazz1.html" COORDS="6,75 93,95">
</MAP>
<IMG USEMAP="#RichieMap" SRC="map1.gif" BORDER="0">
So what do you need to change to make the map work for you?
- Change all the HREF url's to your own
- COORDS are the coordinates of your hotspots. We already talked about x,y coordinates, and I've told you how to determine them easily. So find your coordinates and use the proper values. Study the image below carefully and try to determine the coordinates for the four hotspots. I have shown two coordinates to get you started.
Write out the coordinates for the four hotspots on your own, then compare your answers to mine below. The values you obtain should be within +/-4 of mine.
Hotspot 1 COORDS are 35,16 130,43
Hotspot 2 COORDS are 21,53 117,82
Hotspot 3 COORDS are 140,28 236,55
Hotspot 4 COORDS are 175,61 270,88
- Change the name of the image from map1.gif to yours.
Shapes on Image Maps
So far the hotspots on our image maps have been rectangular in shape. Other shapes you can use are: circle, polygon, dot (point). The coordinates for a circle are the easiest to define, while those of a polygon are more involving.
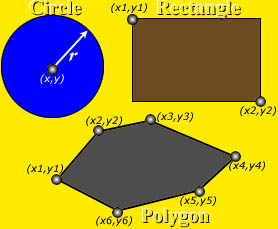
Here's how to define coordinates for the different shapes
Circle: <AREA SHAPE="circle" HREF="url" COORDS="x,y r">
where r is the radius of the circle, and of course url is where the hotspot will direct the user.
Rectangle: <AREA SHAPE="rect" HREF="url" COORDS="x1,y1 x2,y2">
Polygon: <AREA SHAPE="polygon" HREF="url" COORDS="x1,y1 x2,y2 x3,y3 x4,y4 x5,y5 x6,y6 xN,yN">
The number of coordinates you use will depend on the number of sides your polygon has. How many coordinates will you define for a triangle?
Point: <AREA SHAPE="point" HREF="url" COORDS="x1,y1">
default: <AREA SHAPE="default" HREF="url">
You don't need to specify coordinates here, because default space is everywhere outside the hotspots you have described.
In addition to AREA SHAPE, HREF, and COORDS, you can also use ALT="" and NOHREF. We've already talked about what alt does. As for NOHREF, it is used on any hotspot that you don't want to take your visitors anywhere. Here's an example: <Area Shape="Poly" Coords="300,0 300,100 400,100 400,0" NOHREF alt="Click on a link of your choice">.
We've come to the end of this tutorial. What else would you like to know about images that we did not cover here? Send me a feedback on this tutorial, so I can improve on it in future. Use the form below. Thanks.
Continue to Lists...
Send me a feedback on this tutorial, so I can improve on it. Thanks.
Home|Comments, suggestions?
Copyright © 2000
Richie's Tutorials All rights reserved.
|


