Topic: PHP Image Creation using GD Libraries Level: Intermediate to Advanced.
GD Library Installation Let's talk about image creation using PHP. Normally you would use a graphics program to make an image, then upload it to your web space. You then add it to a page by using the img src tag. Instead of doing this, php is able to generate images on the fly when your page loads, and the image is destroyed when the page is closed. Why use php to generate an image instead of making it with a graphics program? I'd say because it makes your page load faster since colors on the images are optimized, and images look the same across all browsers since it is generated by php on the server side. You could also get creative and use it to generate dynamic graphs and charts. In addition, you could install free true type fonts like freetype for your text needs. What have I used this stuff for? Image Engine, voting script. Beyond simple image creation, you can use this capability in php to graph data dynamically on your website. Meaning, as the data in your database changes, the shape of your graph also changes for visual representation on your webpages. Who wants to see all that data you have! A barchart or piechart says it in a nutshell. In addition to image creation, you can also manipulate your own images that you created with other graphics programs. For instance, you could change the text on an image without re-creating the image, you could resize, apply gamma correction, or even develop a full image editing application for the web. Image formatsImages are generated in gif, jpg, png, and wbmp formats. WBMP is intended for wireless devices (not regular web browsers).RequirementsFor most purposes, the GD (available at http://www.boutell.com/gd/) library needs to be installed to use php's image capabilities. However, you can still use php to get the size of images without GD installed. Linux users should already have gd, and windows users can visit http://php.weblogs.com/easywindows/, and http://www.php4win.de/.The php manual php.net/image has a good information about this topic. Also, http://www.boutell.com/gd/#index presents gd functions with example codes. Now let's create a simple image. I've broken the process into four parts:
Header("Content-Type: image/gif"); $img = ImageCreate(500, 75); $color = ImageColorAllocate($img, 0, 255, 0); ImageFill($img, 100, 100, $red); ImageGIF($img); ?> HeaderHeader("Content-Type: image/gif"); The header is used to tell the client's browser the type of data that is to follow. In our example above, the data type is image/gif. If you were creating a jpg or png image, the type will be image/jpg and image/png respectively. The type of image you choose to create depends on the version of gd you have installed. GD libraries for jpg and png images are freely available, but that of gif images may be hard to find because of the copyright issues with gif images. You can get gd for gif in versions of gd up to 1.6. Image Size$img = ImageCreate(200, 75); This is used to define the size of your image as width and height. In this case I want my image to be 200x75 pixels. So to define image size, you need the function imagecreate( ). The size info is stored in a variable, in this case $img. Of course the variable name could be any name you choose. Image Color$color = ImageColorAllocate($img, 0, 255, 0); Ok so we have the header sent and image size defined. Next step is to define the color using the function ImageColorAllocate( ). Colors are defined in RGB format. You can do a search online for an RGB color chart. Let's work with green, which is 0, 255, 0 and stored in $color. ImageColorAllocate( ) requires two parameters: 1. the image that the function is to act on, and Fill and outputImageFill($img, 0, 0, $color); As the name suggests, imagefill( ) is used to flood fill an area with the color you define. The parameters required for image fill are: 1. the image to act on, 2. the x, y coordinates, and 3. the color. Parameters 1 and 3 should be clear to you by now. x, y coordinates is better explained visually. If you already know this, just skip this part to the next section.
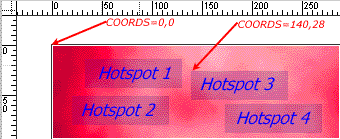
The graph above has two dimensions, an x-axis and a y-axis. Coordinates are x and y values that describe the position of a point on the graph. Why don't we find the coordinates of the colored squares then...
Conventionally the zero points (vertex) of the x, y coordinates is at the bottom of the graph. With php images however (and with image maps too), the zero points will be at the top. What I'm doing here is purely to make you confortable with finding coordinates. Study the image below carefully and try to determine the coordinates for the four hotspots. I have shown two coordinates to get you started.
Write out the coordinates for the four hotspots on your own, then compare your answers to mine below. The values you obtain should be within +/-4 of mine.
Hotspot 1 COORDS are 35,16 130,43 Remember that when finding coordinates, the x value comes first, and it will always be on the horizontal axis. This may sound trivial now, but when you begin creating complex polygons, any doubts you may have about coordinates immediately becomes obvious. On the image above, you can see that the zero points are located on the top left hand side, as opposed to bottom left hand side. Now returning to our php image ImageFill($img, 0, 0, $color); You can see that we want to fill our image $img beginning with x, y coordinates 0, 0, and we are using the defined color $color. Finally, we ouput the image to the browser with ImageGIF($img); If creating jpg or png, the function will be imagejpg and imagepng respectively. You're done. All you do now is put the code between php identifiers and then use html img tag to show the image. Save the file and use a browser to open it. What you see will be similar to the image below
<?php $img = ImageCreate(200, 50); $color = ImageColorAllocate($img, 0, 255, 0); ImageFill($img, 1, 1, $color); ImagePNG($img,"rect.png"); ?> <img src="rect.png" border=0>
|