By: Richard (May 25, 2006)
What is OpenOffice?
OpenOffice is the free alternative to Microsoft Office. Do you use Microsoft Word, Excel, Powerpoint, Access, etc? If you do, you know you have to pay hundreds of dollars to purchase a copy for your computer.
But what if you cannot afford to pay, or what if you are a non-profit organisation operating on a lean budget? In such a case, you can download and install OpenOffice free of charge. OpenOffice can do everything that Microsoft Office can.
Where can you get OpenOffice?
At http://www.openoffice.org. Install the program first before you continue below.
OK, now that you have OpenOffice installed, let us talk about mail merge. You are familiar with Microsoft Word. The OpenOffice equivalent of Ms Word is OpenOffice.org Writer.
Also, if you don't know what mail merge is, it simply allows you to have all your contacts' email addresses, along with their name and other information, all in one file. Now, let's say you want to send the same email to all of those contacts, and you want each email to be customized with each contact's name. To do this, you normally have to send one email at a time, and manually enter each contact's name. With mail merge, you create your email once in OpenOffice.org Writer, select the contacts you want to send the email to, and when you click send, each email will automatically have the name of the contact. This is a real timesaver!
The key to doing mail merge in OpenOffice Writer is to have all your contacts in a database table. This is very easy to create. Once the database is created, you then tell Writer to get recipient info from the database.
How do you get your contacts into a database table?
To make things easy, I will assume you have your contacts in a plain text file as shown below. But note that you can import data from many other sources, such as spreadsheet, Outlook addressbook, Access, Oracle, MySQL, etc.

Put each field in quotes, and separate each by a semi-colon. Save it as a text file, eg. emails.txt. I saved mine in a folder on the desktop called emails.
The first row is just a description of each field as you can see above.
First let's learn how to create the database in the format that OpenOffice recognizes.
-
- Note: you may need to first install the following before you continue.
libreoffice-base-core
libreoffice-report-builder

Furthermore, if you're on linux (e.g. ubuntu),
apt-get install libreoffice-*

will give you a long list of alternate addons you can install. Just look through and pick what to install.
- Open OpenOffice Writer.
- Click File, New, Database.
- Under what do you want to do, select Connect to an existing database.
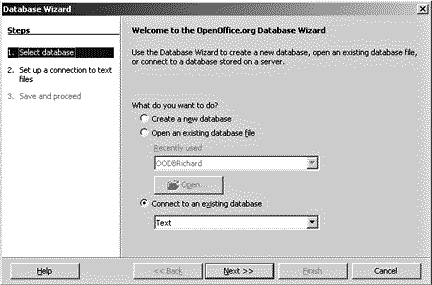
- Select Text from the dropdown. If your contacts are saved in a different format, select the appropriate format.
- Click Next.
- Under path to text files, click Browse, select the folder that contains your file. You won't see the files at this stage, so click ok after selecting the folder.
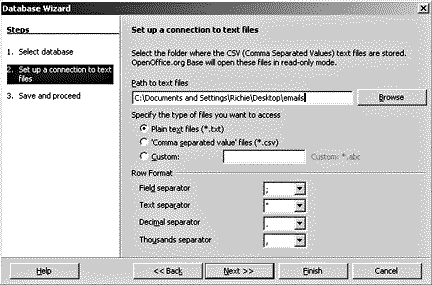
- Under specify the type of files you want to access, select the file type. In my case, I have a plain text file, so I select Plain text.
- Under Row Format
- My fields are separated by ;
- My text separator is "
- Click Next.
- Select Yes, Register the database for me. This makes your database table appear in OpenOffice Writer automatically.
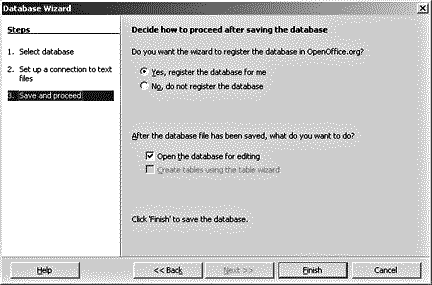
- Remove the checkmark in Open the database for editing, unless you wish to edit the data once it's created.
- Click finish.
- Give the database a name you want. I called mine MyContactsDB. Later, this name will let you identify this particular database from any others.
- Save the database somewhere on your hard drive. To keep things neat, I created a folder, Databases under C:\Program Files\OpenOffice.org 2.0, and saved it there. So now I have my database saved in C:\Program Files\OpenOffice.org 2.0\Databases.
Now that we have our database of contacts, it's time to create our email message.
- Compose your email message, and format it anyway you want.
- Add Dear <First Name> at the top. Type the salutation exactly as shown, including the angle brackets. We will see why later.
- After that, click View, Data Sources.
- A new pane should open up at the top. Look for the database you created earlier.

- I called my database MyContactDB. As you can see, it's shown on the list in the image. Click on the plus sign next to it. The plus changes to a minus.
- Now you should see Queries, Tables. Click on the plus sign next to Tables.
- Click on the name of the database table you created earlier. I called mine oodb. Now the contacts will be shown in the right pane. All of those contacts will receive the email we just composed. You can exclude some of them later if you wish.
- click Tools, Mail Merge Wizard.
- Select Use the current document. This is the email you composed.
- Click Next.
- Select E-Mail Message.
- click Next.
- Click the button, Select Address List..., which should show a list of your databases. Select the database that contains your contacts.
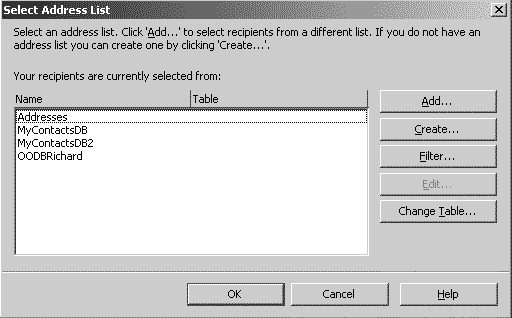
- That will show the tables in that database. Select the table that contains your contacts, click OK.
- Click Next.
- You can get creative here about your salutation. See what I did below.
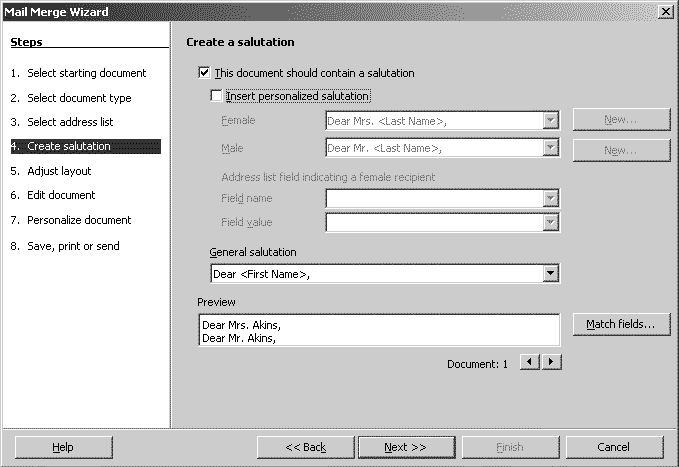
Basically, I unchecked Insert personalized salutation.
- Under General Salutation, I typed Dear <First Name>. The <First Name> is automatically replaced with the recipient's first name when the email is sent. This is the crux of mail merging.
- Next, click Match Fields... In my case, my database table contains three fields (First Name, Last Name, Email). So, I went through and matched each Salutation Element with the field in my database table. Use the scrollbar to see all fields.
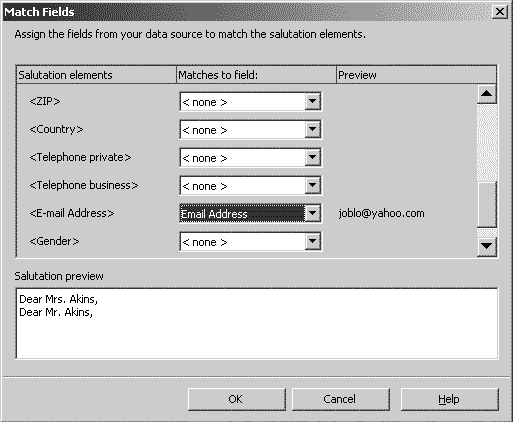
- Click OK. Click Next.
- You should now see a preview of your document.
- Click Next. Click Next again. If you don't want to do any editing, click Next again.
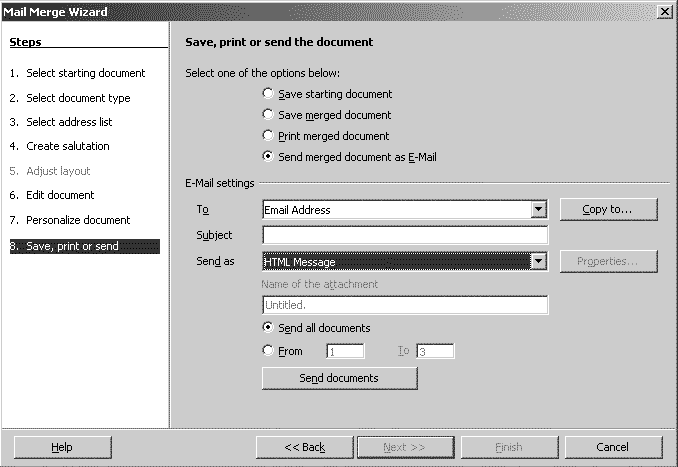
- Select Send Merged document as E-Mail.
- Under E-mail settings, the To field should be E-Mail, of course.
- Enter a Subject. Choose how you want to send your email. I chose HTML Message.
- Finally, Click Send documents to send your emails.
So there you have it, a quick overview of mail merge in OpenOffice Writer. There are a lot more possible customizations. Explore on your own to discover the power of mail merging.
Copyright © 2000-2006
Richie's Tutorials All rights reserved.